Thursday, October 27, 2011

AndroXplorer for Android

AndroXplorer supports advanced multi-views file browsing. Navigation is easy as swiping left or right. Each view has a self-contained folder with full filemanager functions.AndroXplorer are sliding drawers for file sorting, navigation and toolbar.  Options also available to uninstall and performing backup where it is applicable.


Image and video hosting by TinyPic

Image and video hosting by TinyPic


              Download AndroXplorer File Manager 


Android: How to turn Off Shutter Sound In Camera ?

Root Explorer > System > Media > Audio > Ui > Mount R/W > delete (or move to SD) camera_click.ogg. You can delete VideoRecord.ogg 


How do root your Android phone?

First of all, unforgiven512 deserves most of the credit for coming up with the initial tutorial for perm root and s=off for the new HTC devices. Also, thanks to adwinp for the instructions on hexeditting the kernel module to make it work with the MT4G.

This was a collaborative #g2root effort, primarily involving scotty2, tmzt, IntuitiveNipple but also many others!

Ok, so the usual disclaimers go here:

I am not responsible for your bricked phone or the ignorance that may or may not have caused it based on the fact that you CHOSE to follow these steps. Read through the forums and LEARN before you attempt to flash any device. You have been warned.

This method only works for those devices who have already received their OTA update!!!

Now that that is out of the way here we go:

First make sure you have visionary installed!

Root.rar (all files plus a script to make things a little easier. )
http://www.mediafire.com/?flit79p2y069bb3
md5sum: 46361b0cc8652d88688c0ab66d44950b

1. Download the root.rar file and unzip it to /sdcard on your device.

2. Run VISIONary to gain temp root.

Now I am going to run two different sets of instructions (you'll understand why in a minute):


Terminal Emulator Method
3a. Start terminal emulator up on your device.(I prefer this method b/c you can see the output.)

a. type "su" + enter to gain root privileges.

b. Type "cd /sdcard/root" + enter.

c. Type "sh root.sh" + enter.

d. Follow the on screen prompts.


File Explorer Method
3b. Start up root explorer, sufbs, or some other type of file browser with root privileges.

a. Navigate to /sdcard/root on your device.

b. Click on root.sh and allow it to run. Some file browsers ask you if you want to or not.

c. Now wait about 18 to 20 seconds and restart your device into the bootloader to check if S=off is displayed.

4. Start the device back up.

5. Run visionary again and reboot again. This will make root stick.

You can now uninstall visionary and enjoy permaroot.

Alternative Root Process

First, uninstall visionary and superuser and restart your device to wipe out temp root.

Second, download MT4G Modperm.zip and unzip its contents to your sdk tools directory.

MT4G Modperm.zip: http://www.mediafire.com/?eaw0q0zjc7rrrwh
MD5Sum: 3ea4a7a6ddee711d12f7350ce60fae33

Then:

Windows Users:
1a. Using Explorer navigate to the root of your sdk. Hold shift and right mouse click on the tools folder. Select "Open command window here".

2a. Type "adbbat" + enter. Wait till the batch file finishes.

Linux Users:
1b. Using file browser of your choice (or terminal) navigate to the tools folder of your sdk and double click on adbbat.sh (type sh adbbat.sh if you are using terminal). Credit for adbbat.sh goes to slhpss.

2. Disconnect your phone from the PC.

3. Open terminal emulator on the phone and type "/data/local/rage" + enter. Wait for "Forked XXXXXXXX children" to appear and then close the terminal.

4. Start terminal back up. It should force close.

5. Start terminal back up, again. This time it should stay open and you should have a "#" prompt instead of a "$" prompt. Then type "/data/local/temp.sh.

6. When the script finishes run /data/local/rage again and sit tight. The phone should start acting weird and do a soft reboot. Then right after everything loads it should do a hard reboot. After the hard reboot reboot and check S.(If it doesn't do the two reboots just reboot into hboot yourself after rage finishes with the "forked xxxxxxxx children" message.

7. Enjoy root!

If you still have problems getting su to work after this uninstall visionary, shutdown, pull battery, and restart. Should work after that. Props to PolishDude for figuring that one out.

If you have tried EVERYTHING and still cannot get it to work for through the process and wait 30 minutes to an hour. The driver might have a cache delay write and you may need to give it some time to allow the sync command to work. This has worked for one other person (mfouco). BTW, this was figured out by coachmai. Props man!

If su doesn't stick, flash again! You can't overroot it!

Process for turning S back on

Download this file and unzip it to /sdcard on your device.

unroot.rar
http://www.mediafire.com/?12oi5elu7v2y8og
md5sum: aad4e64126cf8d92d7e8b5abb48fdadd

Terminal Emulator Method
1. Open up terminal editor on your device.(I prefer this method b/c you can see the output.)

a. Type "su" + enter to gain root privileges.

b. Type "cd /sdcard/unroot" + enter.

c. Type "sh unroot.sh" + enter.

d. Follow the onscreen prompts.


File Explorer Method
2. Open root explorer, sufbs, or some other file browser with root access.

a. Navigate to /sdcard/unroot.

b. Click on unroot.sh and allow it to run. Some file browsers ask permission before they execute scripts.

c. Wait 18 to 20 seconds and reboot your phone into the bootloader to check if S=on.

You now have S=ON again.

Since we opened up the nand to writes you should still retain persistent root privileges.

Hope this makes it all easier for you.
Cheers --grankin01

For everyone that is have trouble writing to the protected areas of the system after following the rooting procedures.

Reboot into Clockwork recovery and choose the mounts and storage option. From there choose mount system (or whichever protected directory you want access to) and click the trackpad. When unmount system shows you have rw access to the /system directory and all of its subs.


Android Bluff My Call


Android Bluff My Call allows you to have any number appear on your Caller ID, Change your Voice, Record your Calls and more. Supports 7 languages & have local access numbers in 25 countries. Free calls are limited to 2 minutes. With Pro version you get no time limits or ads. 
                                               
Image and video hosting by TinyPic

  
                                 Download BluffMyCall 

EVEREST Ultimate Edition v5.01.1720 Full Portable

EVEREST Ultimate Edition:
Photobucket


EVEREST Ultimate Edition is a free application software, system diagnostics and benchmarking solution for enthusiasts PC users . During system optimizations and tweaking it provides essential system and overclock information, advanced hardware monitoring and diagnostics capabilities to check the effects of the applied settings. CPU, FPU and memory benchmarks are available to measure the actual system performance and compare it to previous states or other systems. Furthermore, complete software, operating system and security information makes EVEREST Ultimate Edition a comprehensive system diagnostics tool that offers a total of 100 pages of information about your PC.


                                download everest  

Saturday, October 15, 2011

How to maximize your android phone's battery life?

Why are you here? I think i can answer your question! You have got a nice & powerful android phone but there is only one problem: you are so addicted that the battery runs out quickly, may be daily. But now, you don't have to be worry about this severe problem. Because I am writing this article to show you How to maximize your android phones battery life. Follow this simple things. You will be very much comfortable with your battery life. Just read the full description.


1) Use Android’s Built-in Battery Usage Screen

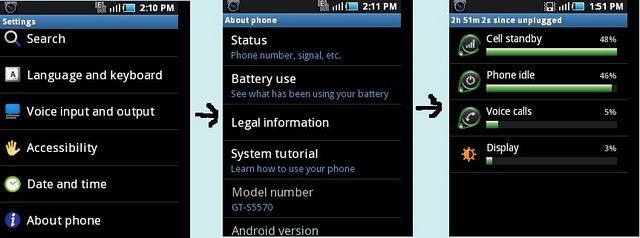
There’s a screen built into Android that most casual users probably don’t even know about, and it can tell you exactly what is killing your battery. Head into Settings –> About Phone –> Battery use to see what has been killing your battery life.


Photobucket

2) Adjust the Backlight to be Less Bright
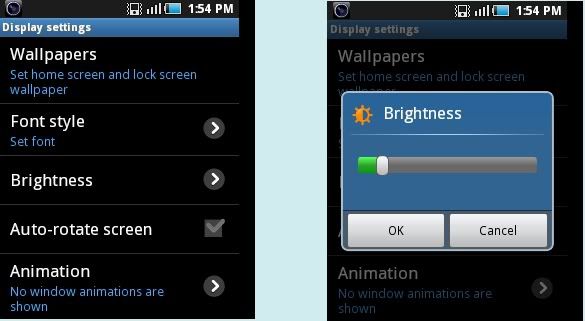
Since we’ve already determined that the backlight is usually the biggest problem, you should probably adjust the settings. Head into Settings –> Display –> Brightness, where you can choose to automatically adjust, which usually works fairly well, or you can just turn the brightness down to the lowest acceptable level.


Photobucket
 

 3) Disable Your Wi-Fi When You Don’t Need It
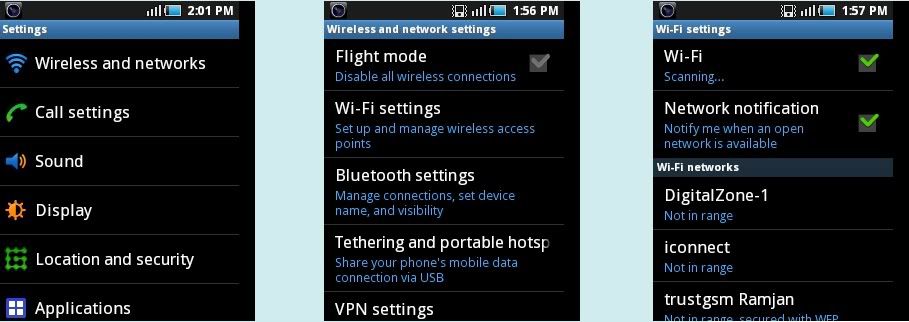
Wi-Fi can really speed up accessing data on your phone, but it can also be a big drain on the battery if you don’t need it enabled, especially when you are out and about… The phone will try and scan for a wireless network even though you may not want it to.
To enable Airplane mode, you can head into Settings –> Wireless & networks–> Airplane mode.


Photobucket

4) Disable Bluetooth if You Don’t Use It

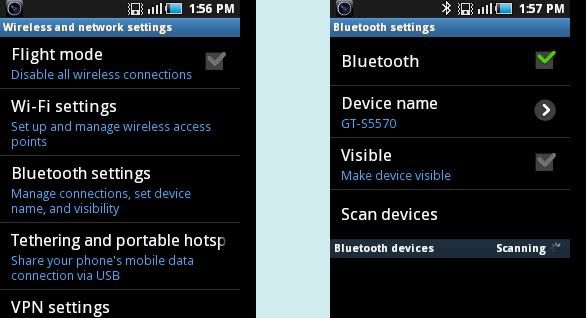
If you aren’t using a wireless headset, there’s no reason to have Bluetooth running all the time, and you should probably cut it off to save the battery life. If you never use it at all, head into Settings –> Wireless & networks–> Bluetooth.


Photobucket

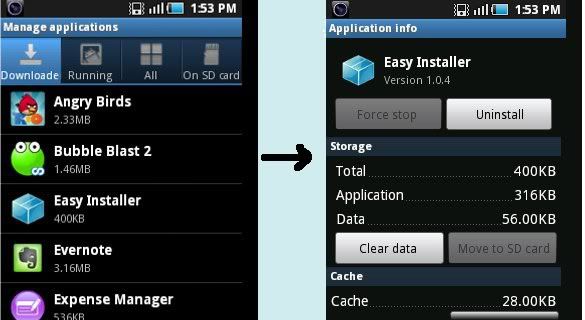
5) Disable or Remove Applications That You Aren’t Using
Once you have identified the application that you don’t want running all the time, check in the settings to see if it can be removed from running in the background. Some applications will give you an option for notifications that can be turned off if you don’t need them, making the application not check in the background so often.
It should go without saying, but we’ll say it anyway—you should remove the apps that you don’t need anymore, especially the ones that are draining your battery as determined from the android battery panel or task manager. Head into Settings –> Applications –> Manage Applications and then you can click the Uninstall button for an app.


Photobucket

6) Disable Home Screen Widgets You Don’t Need
If you’ve got loads of widgets that are pulling data from the web, that means they are likely pulling down data in the background all the time. You should try not to go overboard with these, or remove the ones you don’t actually need.

Photobucket

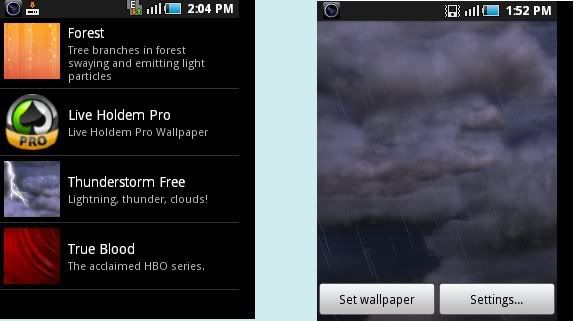
7) Disable Animated Wallpaper
Yeah, that sweet animated wallpaper doesn’t help your battery any. Get rid of it for a small extra battery savings.


Photobucket

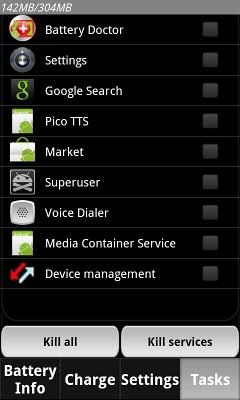
8) Use a Task Manager to See What is Always Running
It is a wise decision to have a copy of Battery Dr To Save Battery or a similar application installed on your phone to help you kill applications that don’t need to be running, but more so that you can see what exactly is launching itself repeatedly in the background. You can setup an auto-kill list for applications you don’t use that often—make them cut off when you shut off the screen, or after an interval.


Photobucket

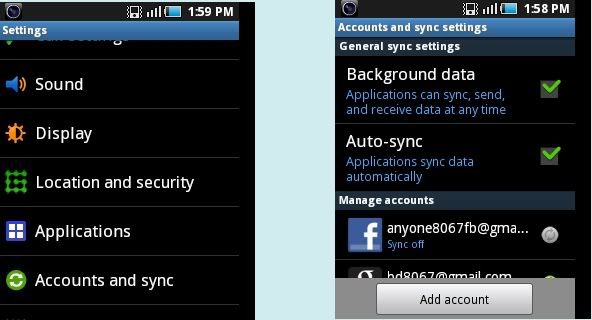
9) Disable Apps that Sync Constantly
The built-in Email application (not the Gmail one, which uses Push technology) can suck the battery badly, because it syncs on a too-regular basis, especially when you have lots of accounts—each one of them is set to sync every 15 minutes. You’d be better off setting it up to sync manually, but if you want it to sync automatically, you should set it to sync less frequently.
Open up the Email application, head to your account, and choose Account settings –> Email check frequency from the menu. Change this to something more like an hour… or never. You can always hit refresh manually when you want to read your email.

Photobucket

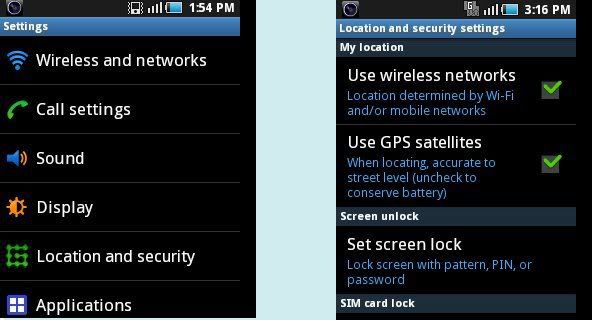
10) Disable the GPS Location Features
One of the biggest battery sucking features on my droid is the GPS… When I have navigation going, the battery dies far too fast, so I end up having to keep it plugged in the whole time I am driving. This makes sense… but what you might not know is that a lot of other applications use the GPS as well.
You can also change the GPS to use wireless networks, and uncheck the option for Use GPS satellites—this will make the GPS a little less accurate, but it will save your battery. Note that you probably want the real GPS enabled if you’re using Google Maps Navigation.

Photobucket


Extra Care:
Keep the Battery from Getting Too Hot

One of the quickest ways to kill a battery is to leave it out in the sun—try and keep your phone somewhere that isn’t too hot whenever possible. You’ll end up needing to replace the battery a lot quicker if you don’t.
If you are facing any further problem. Let me know via commenting. Thank you!

These methods are Working on: Galaxy S, S2, Galaxy tab, Galaxy Pop/Mini, Galaxy Gio, Galaxy Fit, Galaxy s5, Galaxy Ace, Htc Wildfire, HTC Desire HD, HTC Incredible, LG Optimus One, Optimus 2X, Optimus S etc.